How to turn a 16:9 photo into a Reel and test its reach
SUMMARY
A wide dining-room photo becomes a six-second vertical Reel in this walkthrough. Play the sample, see how the opening question leads into a closer view, and use the same sequence with your own photo. Then change one line and compare accounts reached and average watch time after the same interval. If your goal is menu or store visits, the guide explains which link data you need to measure those separately.
Lan He
Contents
Pick one question your photo can answer. Put the wide shot on a vertical timeline, cut to the detail that answers the question, and give the viewer a reason to share the result. Export the video and test two openings. Instagram’s reach figure will tell you how many accounts each version reached.
Quick version
- Write down who the Reel is for and what the photo helps them decide.
- Fit the 16:9 image onto a 9:16 canvas and mark one detail for a close-up.
- Make a short sequence and check the exported video on your phone.
- Create a second opening and share the versions under comparable conditions.
- Compare reach and watch time after the same interval, then choose what to repeat.
Before you start
Use a photo you have permission to share, a video editor that lets you set a vertical canvas and trim a still image on a timeline, and access to the Instagram account that will post the Reel. To run the comparison, check that the account shows Reel insights. If you only have the photo today, you can still finish and save both edits.
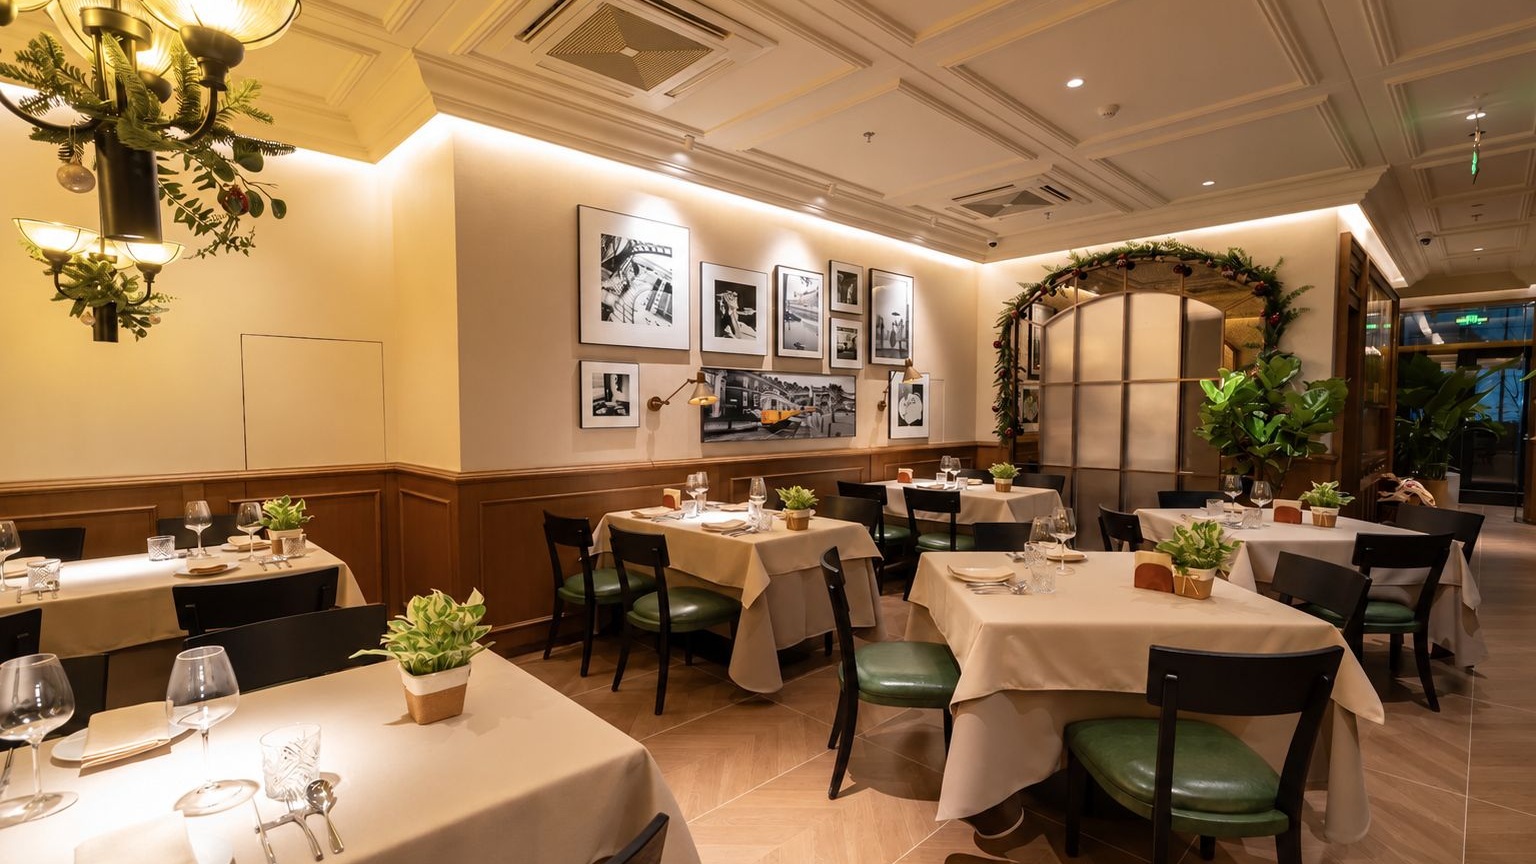
This walkthrough uses Osteria Sole’s dining-room photo. We prepared a 1536 × 864 working copy from the original landscape photograph. The six-second video below is an editorial example made from that file for this tutorial.
Make and test the Reel
Step 1: Give the wide shot one job
Picture two friends picking a dinner spot. They might want to see where they could sit before sending the place to each other. The wide shot answers that question because the tables, framed wall and arch appear together. Write the opening line you would use in that conversation. Our first version asks “Where would you sit?”
For a product photo, the same exercise might lead to “Which of these two mugs fits under your machine?” Use that line only if the picture actually shows the difference. Finish with one sentence a new viewer can understand and one detail in the photograph you can point to as the answer.
Step 2: Fit the whole scene, then find the detail
Start a 9:16 video project. Import the wide photo onto the timeline. Scale it proportionally until you can see both ends of the dining room. The space above and below the photo gives the question somewhere to sit. A plain background picked from the image keeps the words easy to read.
Duplicate the still on the timeline. On this second copy, zoom in on the tables beneath the framed pictures. Switch between the two views on your phone. The wide view should establish the room, and the close-up should give someone a table they can point out. If the enlarged detail turns soft, back off the zoom. For a product label, try reading the exact variant name at this size before keeping the shot.
Step 3: Build a sequence that works with sound off
Set the first still to two seconds. Use the tighter view for the next two seconds and return to the wide image for the last two. Add a line to each shot. The example opens with “Where would you sit?”, moves to “By the gallery wall” and closes with “Send this to your dinner date.” Someone choosing a restaurant has a specific person and reason to share it with. Choose a different invitation if your customer is doing something else.
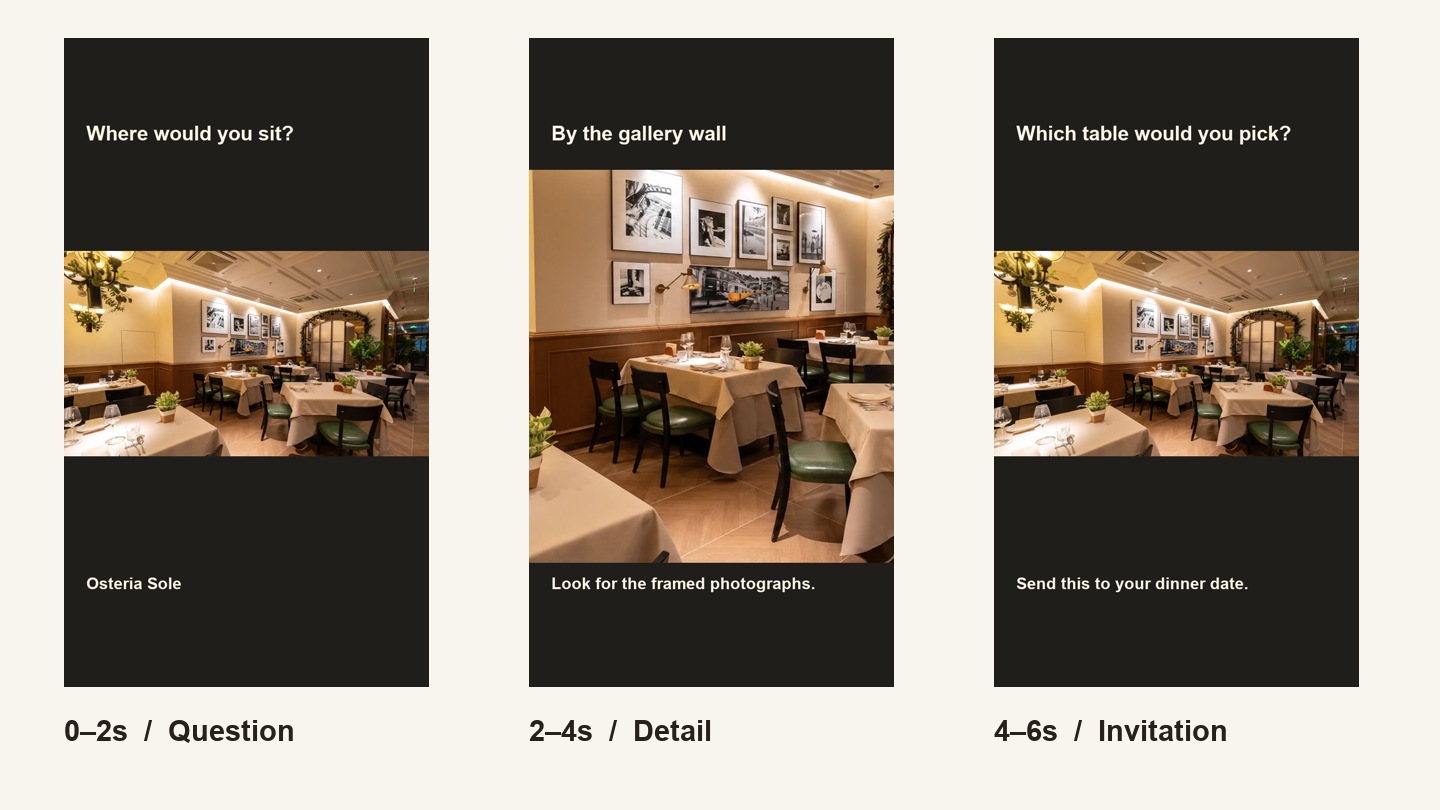
Play the six-second Reel made from this photo (MP4). The example is silent. Play your own edit once without pausing. If the question flashes past before you can read it, extend the shot or cut words. Six seconds is the length of this example. Your subject sets the pace.
Export an MP4, reopen the saved file and check the first and last frames. In the Instagram posting preview, look for captions or controls covering a name, price or other essential detail. A finished file is ready when someone can recognize the subject, read the question and see its answer on a phone.
Step 4: Change the opening and give it a fair test
Save a second copy of the project. Change just the first line to “Looking for a table for two?” Keep the lead photo, the other two shots, timing, caption and audio the same. Name the exports so you can recognize the question in each one later. Watch the first two seconds of the files side by side to confirm the intended difference.
If your account offers Instagram Trial Reels, you can try an opening with non-followers first. Use the same distribution setting for each version. With ordinary Reels, use comparable posting slots and note the date, audience and any promotion that might affect the result. Choose the interval before posting; for example, record each Reel’s numbers 48 hours after it goes live. Audiences and timing can differ even when you hold the edit steady.
Step 5: Read the result and choose your next opening
Open each Reel’s insights at the interval you chose. Copy accounts reached as your main measure of how many distinct accounts saw it. Record average watch time and shares alongside it if available. Views can include repeat plays. Instagram describes how watch time and replays are counted in its guide to Reel insights.
- Opening: first line, posting time, trial or ordinary Reel.
- Reach: accounts reached at the chosen age.
- Viewing and sharing: average watch time and shares, if shown.
- Next edit: the opening to try with another photo and your reason.
If the table-for-two opening reaches more accounts and viewers also stay long enough to see the close-up, try that question again with another room photo. If reach rises but average watch time falls, inspect the cut after the opening. Does the picture deliver what the first line promised? With a small or mixed result, keep both readings and repeat the comparison before changing your approach.
If your goal is visits to a menu or store, record those separately using a destination link you can measure. Use distinct tagged links only where you can reliably give each version its own clickable destination. A shared profile link makes it harder to attribute visits to one Reel. This example demonstrates how to edit and compare the videos. Its audience results have not been measured.
Working with Stillmore
For a team-made version, send the original photo with the audience question, the detail that must stay visible and the opening you want to try. Check the selected Inspiration for its available format. A useful restaurant brief is “Show the whole room first, then the tables by the gallery wall. Leave room for our opening question.” You review the delivered work, post it on your account and read the results there.
Common mistakes
- A center crop removes the feature the opening asks about. Fit the full image first and use a separate close-up.
- The closing line asks for a booking but the post gives no way to book. Give one action the viewer can take from that placement.
- One version was boosted or ran for a week longer. Record that difference and compare another pair under closer conditions.
FAQ
Can I use a single photo for the whole Reel?
Yes. Place the photo on a video timeline, duplicate it for another view and export the sequence. Play the saved video on a phone to check that the change of view reveals a useful detail.
What if a portrait crop cuts off part of my product?
Fit the full wide image inside the portrait canvas and use the spare space for a short line. Save the close-up for a second shot. If the identifying label is unreadable in the original, take another photo before editing.
Do I need music to try the two openings?
The room example works silently. If you add sound, choose audio you can use for the post and keep it identical in both versions so the opening is the change you are testing.
What if my account has no Trial Reels option?
Publish an ordinary Reel and compare it with a similar Reel from your own account at the same age. Record differences in audience and timing, and treat the outcome as a clue for your next edit.
Does a higher view count mean more people saw the Reel?
Compare accounts reached to answer that question. Repeat plays can add views. To learn whether more people visited your site, check attributable visits to the destination separately.
Try it with your next photo
Choose one image you already have and write the question a customer might ask about it. Export the first version, save a second opening and put a reminder next to each posting time to read its reach at the same age.

About the author
Lan He
I'm Lan. Years of writing promotional and editorial work in the US, mostly for companies with big audiences and bigger expectations — where a single article might reach hundreds of thousands of readers, and where the good ones kept earning traffic long after the campaign ended. I learned what makes a page survive that: one clear audience, one real question, images that show the actual work, and a structure that keeps people reading. Now I write for small business owners who do everything themselves, answering the questions they actually ask: what's worth posting, which photos are worth taking, and how to tell one story across images, video, and words. I've seen good content carry a small company further than its ad budget ever did.
Give them a reasonto stop by.
Send us your phone photos. Get posts ready to share.
See what we can make